
For the first time I can remember, England is too hot, far too hot. Weather warnings have been issued.
Requirements
You’ll require two custom components, that are available using HACS.
Getting the data
The MetOffice helpfully provide an RSS feed per region that you can use to get information about weather warnings. You can find the RSS feed for your region, here. For example, in the East Midlands I’ll be using https://www.metoffice.gov.uk/public/data/PWSCache/WarningsRSS/Region/em
Now that we’ve got our RSS feed, we need to add this to Home Assistant. To do this, we’ll use the feedparser sensor to pull data in. Add the following code to your configuration (remember to replace the feed_url with the one for your region, and make the name sensible!).
platform: feedparser
name: Met Office RSS East Midlands Weather Warnings
feed_url: 'http://metoffice.gov.uk/public/data/PWSCache/WarningsRSS/Region/em'
date_format: '%a, %b %d %I:%M %p'
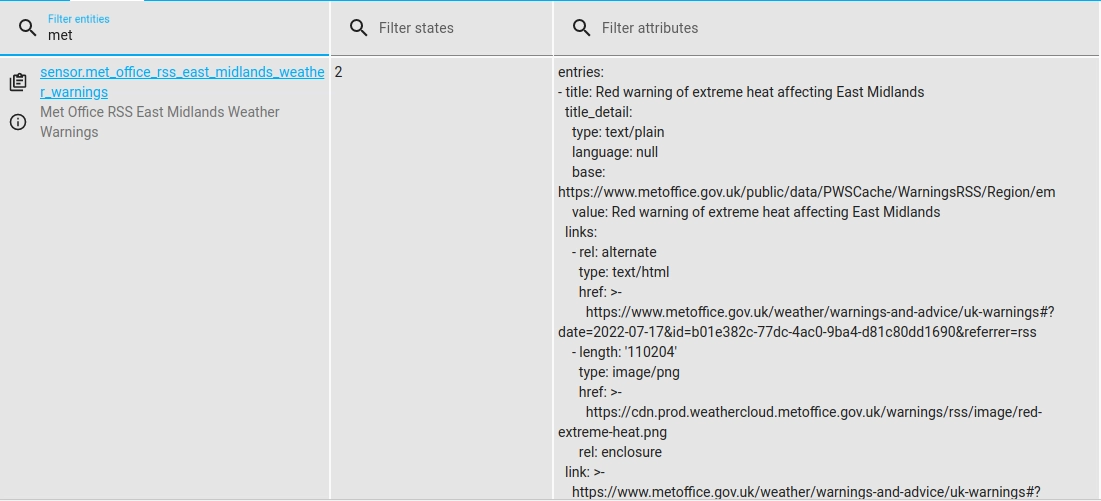
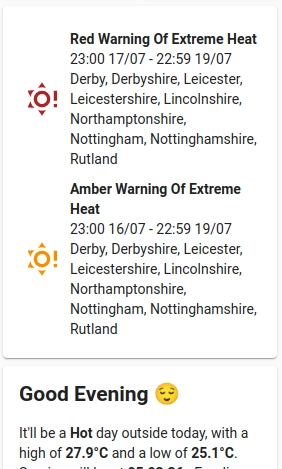
After a quick restart of Home Assistant, you should see that the sensor you’ve created is now populated with data (As long as there actually is a warning in place!). As you can see, there are 2 weather warnings that currently affect where I live (annoyingly the Met Office don’t prioritise their warnings, surely the red warning should superseed the amber warning?)
Showing the data
This was the part that I struggled with the most, Jinja2 templates are not something I use a lot, nor am I very comfortable with them. But! I needed a template so that I could show the data on my dashboard. I did what I always do when it comes to templates in HA, I went to google to find people smarter than me.
Annoyingly, it turns out that those smarter people had actually already implemented exactly what I was looking for, with a perfect template for showing the data in a great way on my dashboard! (Reminder for the future, google these things before starting them). If you want to read more about the template that I’ve used you can find the forum post here
Dashboard code
type: conditional
conditions:
  - entity: sensor.met_office_rss_east_midlands_weather_warnings
    state_not: '0'
card:
  type: markdown
  card_mod:
    style:
      .: |
        ha-card {
          --mdc-icon-size: 40px;
        }
        ha-markdown:
          $: |
            td {
              vertical-align: top;
                }
  content: >
    {% if
    state_attr('sensor.met_office_rss_east_midlands_weather_warnings','entries')
    != 0 %}
      {% for item in state_attr('sensor.met_office_rss_east_midlands_weather_warnings','entries') %}
        {% for type, icon in [('rain', 'weather-pouring'), ('thunderstorms', 'weather-lightning-rainy'),
                              ('wind', 'weather-windy'), ('snow', 'weather-snowy-heavy'),
                              ('lightning', 'weather-lightning'), ('ice', 'car-traction-control'),
                              ('fog', 'weather-fog'), ('extreme heat', 'weather-sunny-alert'), ('thunderstorm', 'weather-lightning')] if type == item.summary | regex_findall_index('.*warning of (.*) affecting.*', ignorecase=True) %}
          {% set color = item.summary.split(' ')[0] %}
          {% set summary = item.summary | regex_findall_index('(.*) affecting East Midlands: (.*) valid from (.*) to (.*)', ignorecase=True) %}
          {% set time_from = as_timestamp(strptime(summary[2], "%H%M %a %d %b")) | timestamp_custom("%H:%M %d/%m") %}
          {% set time_to = as_timestamp(strptime(summary[3], "%H%M %a %d %b")) | timestamp_custom("%H:%M %d/%m") %}
    | | | |

    | --- | --- | --- |

    | <font color = {%- if 'Yellow' == color %}'gold'
                    {%- elif 'Amber' == color %}'darkorange'
                    {%- else %}'firebrick'
                    {%- endif %}><ha-icon icon={{ "'mdi:" + icon + "'" }}></ha-icon></font> | | **{{ summary[0] | title }}**<br />{{ time_from }} - {{ time_to }}<br />{{ summary[1] }} |
        {% endfor %}
      {% endfor %}
    {% endif %}
That’s quite a block of config, you can copy that straight into your dashboard and it will work. If you don’t want a detailed breakdown of the config, you can skip to the next section
type: conditional
conditions:
  - entity: sensor.met_office_rss_east_midlands_weather_warnings
    state_not: '0'
This first part is the easiest to understand, we’re using the built-in HA conditional card. If the condition insn’t true, then the card is hidden. This will hide the entire card, if there isn’t any alerts to show.
  content: >
    {% if
    state_attr('sensor.met_office_rss_east_midlands_weather_warnings','entries')
    != 0 %}
      {% for item in state_attr('sensor.met_office_rss_east_midlands_weather_warnings','entries') %}
        {% for type, icon in [('rain', 'weather-pouring'), ('thunderstorms', 'weather-lightning-rainy'),
                              ('wind', 'weather-windy'), ('snow', 'weather-snowy-heavy'),
                              ('lightning', 'weather-lightning'), ('ice', 'car-traction-control'),
                              ('fog', 'weather-fog'), ('extreme heat', 'weather-sunny-alert'), ('thunderstorm', 'weather-lightning')] if type == item.summary | regex_findall_index('.*warning of (.*) affecting.*', ignorecase=True) %}
          {% set color = item.summary.split(' ')[0] %}
          {% set summary = item.summary | regex_findall_index('(.*) affecting East Midlands: (.*) valid from (.*) to (.*)', ignorecase=True) %}
          {% set time_from = as_timestamp(strptime(summary[2], "%H%M %a %d %b")) | timestamp_custom("%H:%M %d/%m") %}
          {% set time_to = as_timestamp(strptime(summary[3], "%H%M %a %d %b")) | timestamp_custom("%H:%M %d/%m") %}
The next part is where the most interesting logic happens, it’s first checking to see if there are currently any weather alerts, there’s not much point in processing the data, if there’s no data to process.
It’s then iterating over the list of entries (as I mentioned earlier, there can be multiple overlapping warnings) to get the different alerts that are available.
From each of the entries in that list, it’s allocating an icon based on the weather type, a color (based on the severity of the weather warning. You can find more here)
Future improvements
Whilst showing it on the dashboard is a great first step. I only infrequently check my Home Assistant dashboard. For me, the whole point of home automation is that I’m not having to go out of my way to do something. In the future, I could re-use some of the Jinja2 template to help me generate a morning briefing that plays when I get in my office in the morning.
It would be quite nice to get a notification when a new warning is issued so that I’m aware of what’s coming
Comments